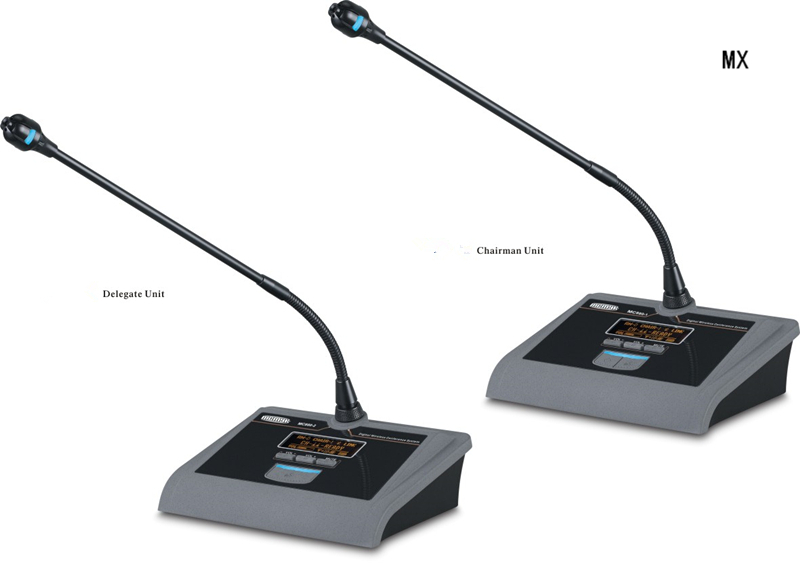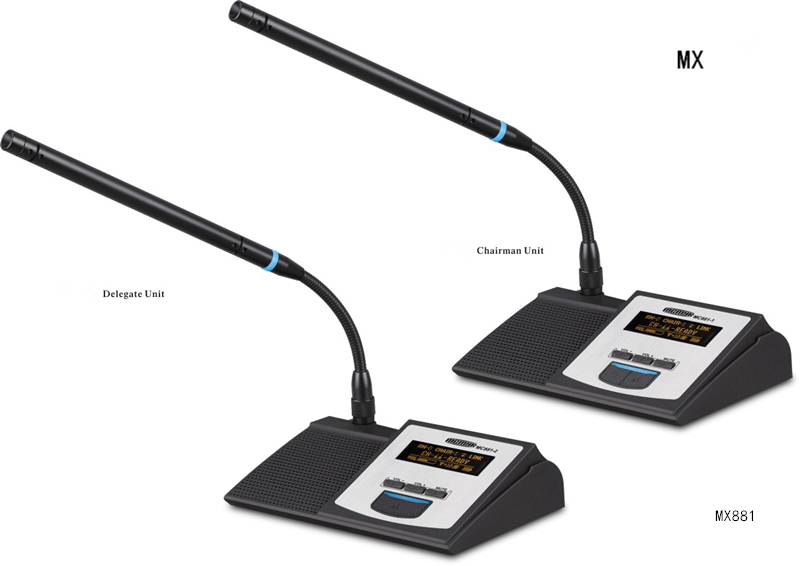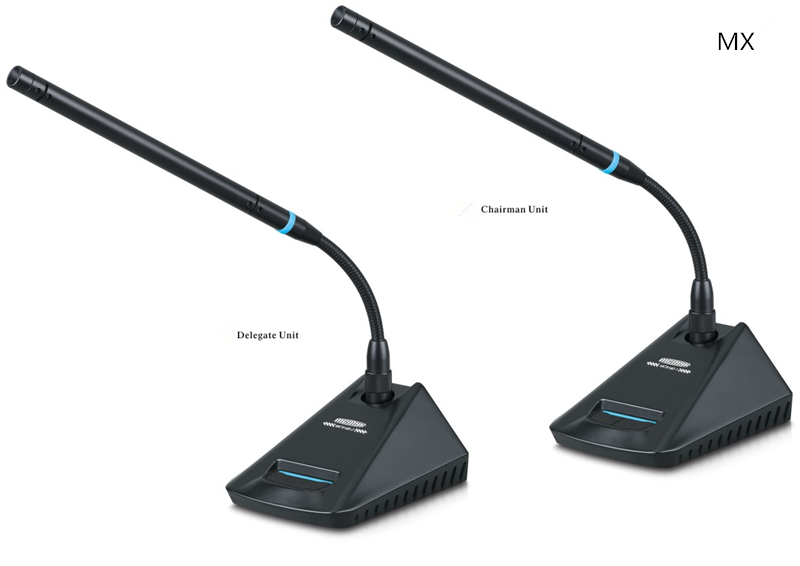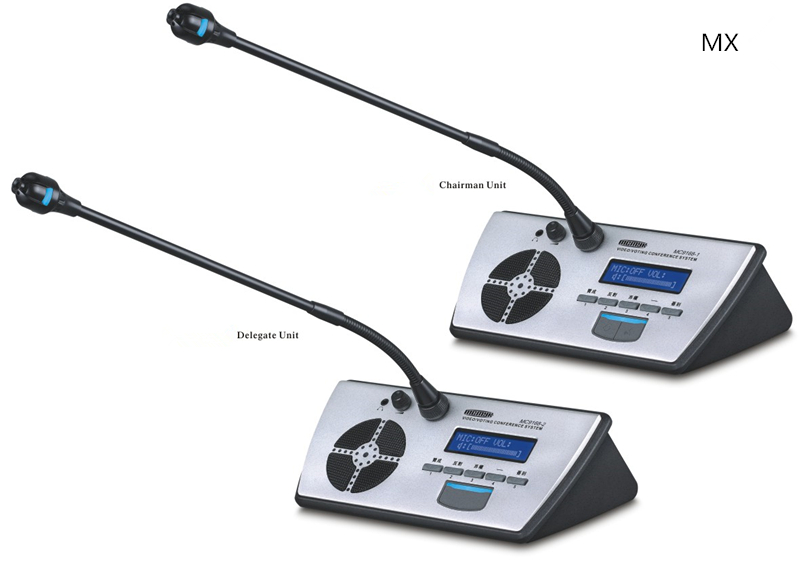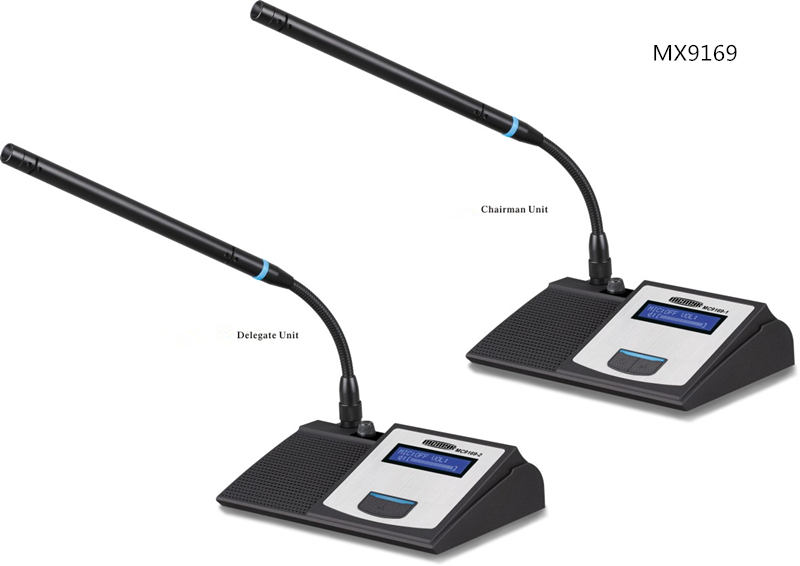


MX9169-1Chairman Unit / MX9169-2 Delegate Unit:
Innovative designs, decent, has been the national utility model and design patents.
Multiple operating modes: FIFO / chairman priority / Limit the number / full open mode.
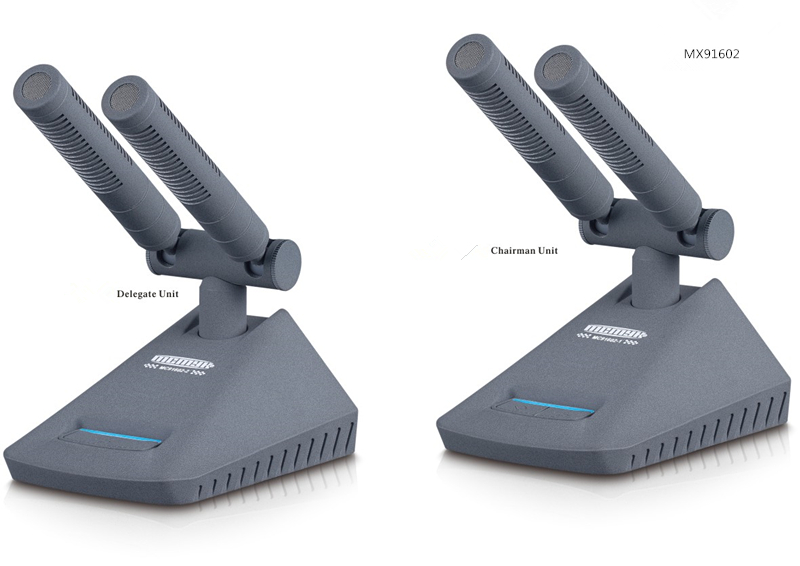
Built-in high-fidelity capacitive sound head, so that the sound reproduction is good, high definition, low noise.
Efficient howling suppression, super pickup effect.
Chairman unit off at any time without any restriction on behalf of unit, which fully demonstrates precedence.
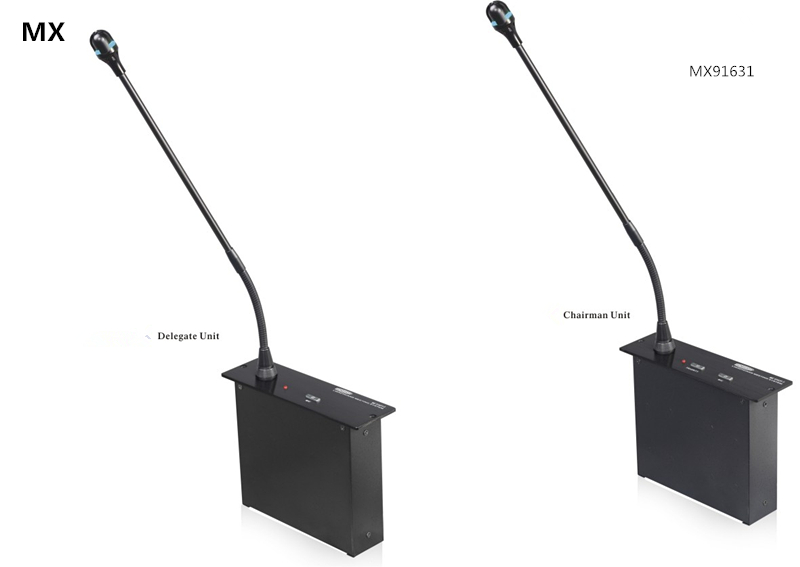
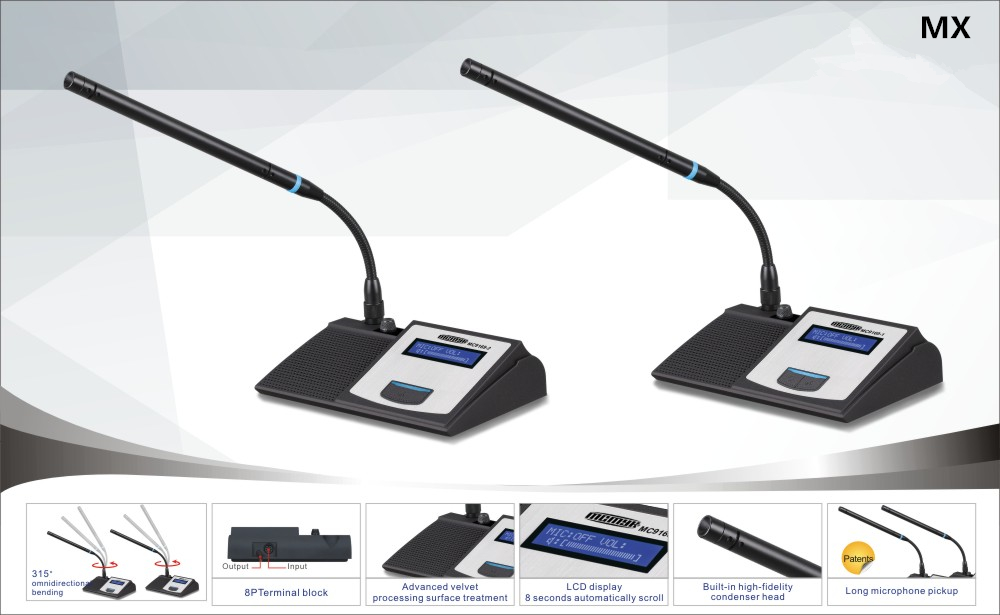
Aviation microphone plug, 315 degree omni-directional bending copper hose.
Microphone is turned on, the microphone indicator lights blue.
Technical parameters
| Type: | Condenser |
|
| Directivity: | Hypercardioid | |
| Frequency response: | 60 Hz -14 KHz | |
| Sensitivity: | -45±2 dB @1KHz | |
| Input voltage: | DC 24V(Central Processor Powered by) | |
| The minimum output impedance: | 1KΩ | |
| Signal to noise ratio: | 68dB(A) | |
| Output Socket: | 8P terminal block | |
| Cables: | 2.1m + T shaped 3M 8P shielded wire | |
| Accessories: |
Wind sponge |

Using industry standard CAN bus. Makes the system run more stable and reliable data transmission.
90 units can be connected to conference microphone unit, three-channel microphone outputs,
each channel can be connected to 30 units, plus extension unit can connect up to 256 microphone
units can be connected up to 928 units of pure voting unit.
Control panel with LCD screen, display the current operating mode and status of the system,
more intuitive and user friendly.
USB encryption key green computer software to run the system controller to operate,
more convenient, accurate and stable.
Electronic sign, vote / election / scoring function.
Intelligent video automatic tracking function.
Access up to eight high-speed PTZ cameras simultaneously, can also be connected toa
high-definition camera.
4+1 HD 1080P video matrix function.
4+1 SD video matrix function.
Multiple operating modes: restricted mode / FIFO mode / full open mode
/ chairman priority mode.
Control multiple PTZ protocols, strong compatibility: Pelco_P / VISCA_SONY-D70
/ SAMSUNG / Pelco _D protocol.
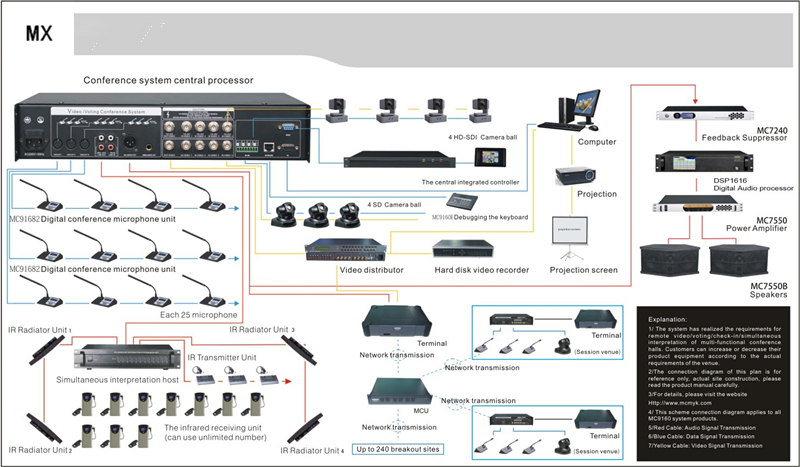
Conference system connection diagram
Technical parameters
| Rated voltage: |
AC220V±10% 50Hz |
|
| Frequency response: |
20Hz-20KHz |
|
| Output impedance: |
REC:200Ω LINE:200Ω BALANCE:300Ω NOBALANCE:400Ω |
|
| Signal to noise ratio: | 78dB(1KHz THD1%) | |
| Size: | 480X375X95mm (2U "international standard rack) | |
| Weight: |
7.5kg |

PC Software Operating Instructions
1、Installation Instructions:
Operating environment: PentiumIII 1GHz or more, more than 256M memory, Windows 98 systems or more,Hard disk space should not be less than 250MB.
1、The installer green run, will not leave any other location on the computer running traces. Absolute security.
2、Insert the procedures disc.Copy the CD-ROM folder to any location on the computer.Best placed in the C or D system disk.
3、Note: The best file directory is the root directory, the best number of folder in the following two layers.
4、Remove the software CD-ROM, insert the USB key, run the CH-8000.exe.
2、User Confirm:
Before using this software, insert the USB key.Run CH-8000.exe following window is displayed:
Press the "OK" button or the Enter key to enter a password, if the password is correct, proceed to the next step; otherwise need to re-input. Press the "Cancel" button to exit the system.
The first run of the software default password is "1" directly "OK" or press Enter to go to the next step.Later, you can set in the "Meeting Control" main window "Modify password" to change the password.
3、SELECT PC PORT
After the password is entered successfully, the following window is displayed:
In this window, you need to select the communication port of the computer and connecting the host system.The host must be powered on.If you use the "COM1" with the host, select " PC PORT COM1 ",(The default setting is "COM 1");If you use the "COM 2" with the host, select " PC PORT COM 2 "
4、Welcome screen:
Communication serial port settings into the welcome screen, double-click interface you can quickly close the welcome screen, you can also wait for 4-7 seconds automatically shut down.
5、The main interface: "Meeting Control"
Note:
1、The host is powered automatic detection, to hear the "B" sound indicates that the communication is normal, abnormal system emits a continuous alarm sound (not connected to any microphone is normal).
2、System working according to the actual number of microphone connected to the system unit number, can be greater than the actual number can not be less.
3、Default settings Chairman Unit 1, if more than one chairman unit must use the software settings,Up to 12 chairman unit.
4、The system assigns the first cell as Chairman, the allocation unit number must start from the President and then to the representative.
5、After system to complete SetUnitID "must" Reset Unit "to ensure that the communication settings are correct." Meeting Control "menu click on the top of the window to enter the Meeting Control window.
"Meeting Control":
1/ "Total Number" set connected to the system unit number should generally be the same or more than the number of the system unit.
2/ "Change Mic ID", please note that the unit number of the system can not be repeated, otherwise there may be unpredictable failure, allocation unit number must start from the President and then to the representative.
3/ "Mic Reset"means that the initialization unit; unit after reset" Unit Detect ", all the cells of the system to detect the number of proofreading, correct then the next step.
4/"Modify Password" can reset the system login password.
5/Click the "Mic On / Off" button to ON / OFF the specified
unit."Close All" means to close all units.
6/"Meeting View"click into the the venue control window.
7/"Talk Mode" is used to set the operating mode of the system,after the appropriate mode has been selected, you can click "OK".
8/The Talking Number: selected number of speakers at the same time, click "OK" to complete the setup.
6、The main interface:"Unit Detect"
Click "Unit detect" into the window, click the "Unit Detect" button detection system microphone, the normal state is displayed "on-line".
7、 The main interface
Dome Control:
Click the "Dome Control "menu at the top of the window, the system will enter "Dome Control" window.Before operating the camera, select the corresponding "Demo ID"," Demo Type", "Demo Bps."Click the arrow button, combined with Zoom + / -, Focus Near / Far, Speed + / -, so that the camera reaches the specified parameters.When the maximum or minimum speed setting, the host will squeak tone.Save the preset position, the best set up the system "FIFO MODE",Select "Preset", the input "Mic ID", at the same time click on the "Preset Mic on".Then adjust the position of the camera until the appropriate date, click "Save Preset "can be.You can click on the "Preview" check preset point.Click the "Default" to clear all preset.
Demo Type:
Camera Type-A: Video Type=1 Pelco_P
Camera Type-C: Video Type=2 SAMSUNG
Camera Type-D: Video Type=3 Pelco_D
Camera Type-E: Video Type=4 VISCA (SONY-D70)
8、Meeting View:
"Meeting View "window, click on the main menu bar of the window" Meeting Control "button to enter;
The main role is to visually see the state of the current speaker; designated representative to speak;
【"Real Map" is selected according to their needs replacement venue background image】
【Select the "Name Display" make the unit number is automatically updated to the representative's name】
9、Proposal List:
【"Proposal List "menu, click on the System window above the system will enter the" Proposal List" window.The main function is to create a meeting proposal】
【Click on the window to the bottom right of "Type / Mode" in the list, select the type of the new proposal.Vote Mode "means that the proposal to create a vote】
【"Elect 3-1" refers to the three candidates selected candidate."Elect 3-3" refers to three candidates can choose】
【"Elect 5-1" is five candidates to select one."Elect 5-5" refers to the five candidates can choose】
【Grade Mode "refers to the" Grading ".Create an election proposal, you can click on "Name List" to modify the names of the candidates."Elect 5-1/5-5" is used only for unit 5 key vote.Please create a proposal based on the actual situation】
【The selected proposal mode, and enter the the proposal subject and content of the proposal, click "New File", you can create a conference proposal.If you want to delete a proposal, the proposal is selected, click the "Delete One".If you want to delete all proposals, click "Delete All"."to Sub-Screen" if they are selected, click on "Enter Vote" button automatically sent to the sub-screen.Select one did not vote / election / grade proposals, click on the "Enter Vote" button to enter the vote / election / grade Interface】
10、Login:
【Click on the System window above the "Login" menu, the system will enter the "Login" window】
【Click "SignIn Start" button to sign state. The unit LED blinks. MIC key sign key】
【Click "SignIn End" button to exit sign, the system will automatically display the sign unit / representative.In the "Name List" window, select "Use sign in list" will sign on behalf of the name】
【Click on "Re-Sign in" microphone can re-sign in."Sign out" function is to make the unit there is no sign in of the voting after the meeting to speak, or can not speak】
【Click on "Name List" button to enter the setup window, you can edit the list of representatives】
11、Enter Vote:
Select a new proposal, click on the "Proposal List" "Enter Vote" button located at the bottom of the menu, enter the voting window;Click on the "Vote Start" microphone into a vote, the unit LED light ring flashes;Click on the "Vote End" to complete the vote, and displays the results of the poll and then;Voting results from a preview of the result, view the results from the sub-screen, or click on the "View Result" to view the results.
12、Name List:
"Name List" window, click "Login" window "Name List" and "Proposal List" in the "Name List" to enter;By clicking on the "Login" window into the "Name List" of, can only be set to vote on behalf of the list, you can not set the election list of candidates;By clicking on the "Proposal List" window into the "Name List" of the list of candidates for election can only be set, you can not set the voting representative list.Select "Use candidate list" will display the names of the candidates during the election;Select "Use sign in list", at the end of the sign will display the name of the representative of the sign."Expected" number can not be less than the number of "Presented" , Otherwise the data suggest that error.
13、Result:
"Result" window, click on the "Proposal List" window "Result" button to enter; You can also enter by clicking on the" View result "after the voting has been completed.
14、Sub-Screen:
Vice-screen, also known as the second screen, is usually connected to a projector or other video equipment. For system information output amplifier.
Note: When the sub-display on the PC screen and maximize by the Caps Lock key and the main operating window switch, left and right slide bar can adjust the font of the sub-screen.
"Mark" operation, select "Use mark", and then select" Public mark "option, the monogram will appear in the preview screen by clicking on the" Send "can send monogram to the second screen; click" Flag save ", the preview screen will be saved, you can save up to 8" Mark "; want to delete a" Mark ", simply save an empty" Mark ".Vice-screen, also known as the second screen, is usually connected to a projector or other video equipment. For system information output amplifier.
Note: When the sub-display on the PC screen and maximize by the Caps Lock key and the main operating window switch, left and right slide bar can adjust the font of the sub-screen.
"Mark" operation, select "Use mark", and then select" Public mark "option, the monogram will appear in the preview screen by clicking on the" Send "can send monogram to the second screen; click" Flag save ", the preview screen will be saved, you can save up to 8" Mark "; want to delete a" Mark ", simply save an empty" Mark ".